Skip to content
PTOffice
  • Capabilities
    • Websites
    • Memberships
    • Emailing and Newsletters
    • Volunteer Signups
    • Fundraisers
    • Calendars
    • Project Notebooks
    • Forms
  • |
  • Support
    • Knowledge Base
    • Contact Us
    • White Glove Support
    • Development Updates
  • |
  • Community
  • |
  • Pricing
Popular Search exportcache

Getting Started

6
  • Account Settings: Organization Settings
  • Website: Web Pages
  • Website: Website Menus
  • Account Settings: Personalize the Dashboard
  • Website: Website Menus – Mobile
  • Getting Started Checklist

Account Settings

6
  • Account Settings: Organization Settings
  • Account Settings: Personalize the Dashboard
  • Account Settings: Update your account main contact
  • Account Settings: Adding Administrators
  • Account Settings: Updating Billing Email Address
  • Account Settings: Back to School Guide

Registration - Requires Shared plan or higher

6
  • Registration: Customize Registration Page
  • Registration: Top 7 Ways to Improve Member Registration
  • Registration: How to Close Registration
  • Registration: Create a custom registration form
  • Registration: What the registration process looks like to a member
  • Registration: Build a custom Registration process

Members - Requires Shared plan or higher

9
  • Members: User Roles
  • Members: Profile Tabs
  • Members: Profile Fields
  • Members: Exporting Contacts
  • Importance of a Clean Database
  • Members: How to Create Print Grade or Classroom Lists
  • Members: How to Change a Username
  • Members: Importing and Creating Contacts
  • Members: Graduating Families

Messenger - Requires Shared plan or higher

10
  • Messenger: Why Are Emails Going to Spam?
  • Messenger: Lists
  • Messenger: Subscription Forms
  • Messenger: Understanding Messenger
  • Messenger: Importing Subscribers
  • Messenger: Personalize your emails
  • Messenger: How to forward successful subscribers
  • Messenger: Remove User from an Email List
  • Messenger: Add User to an Email List
  • Messenger: Creating Your First Email

Sign Ups - Requires Shared plan or higher

12
  • Sign Ups: Getting Started
  • Sign Ups: Create your first sign up
  • Sign Ups: Tasks/Slots
  • Sign Ups: Managing Volunteers
  • Sign Ups: Export Reports
  • Sign Ups: Display sign ups on Sign Ups Listing page
  • Sign Ups: Review system emails
  • Sign Ups: Sign up not appearing on front-end
  • Sign Ups: Set plugin administrators
  • Sign Ups: Customize the display scheme
  • Sign Ups: Create system pages with a shortcode
  • Sign Ups: Tips to Increase Volunteer Support and Retention

Project Notebooks - Requires Shared plan or higher

21
  • Project Notebooks: Getting Started
  • Project Notebooks: Create your first notebook
  • Project Notebooks: Set plugin administrators
  • Project Notebooks: Review system emails
  • Project Notebooks: Create system pages with a shortcode
  • Project Notebooks: Customize the display scheme
  • Project Notebooks: Display project on Project Listing page
  • Project Notebooks: Edit a notebook
  • Project Notebooks: Archive a notebook
  • Project Notebooks: Delete a notebook
  • Project Notebooks: Publish a notebook
  • Project Notebooks: Display meeting minutes on the website
  • Project Notebooks: Create tasks
  • Project Notebooks: Create meeting minutes
  • Project Notebooks: Create a project budget
  • Project Notebooks: Create a kanban board
  • Project Notebooks: Turn on project administrator requests
  • Project Notebooks: Approve project administrator requests
  • Project Notebooks: Hide or show notebook sections on front-end
  • Project Notebooks: Duplicate a notebook
  • Project Notebooks: Understanding Project Notebooks

Website

9
  • Website: What is a shortcode?
  • Website: Web Pages
  • Website: Website Menus
  • Website: Placing Shortcode
  • Website: Add a Google Calendar to Your Website
  • Website: Website Menus – Mobile
  • Understanding Cache – Why Can’t I See My Changes?
  • Troubleshooting: How to fix a 404 page error
  • Website: Set up your DNS to map your domain

News Articles

5
  • News Articles: Intro
  • News Articles: Posts module
  • News Articles: Posts Carousel module
  • News Articles: Posts Slider module
  • News Articles: Posts, Posts Carousel, and Posts Slider modules examples

Troubleshooting

6
  • Messenger: Why Are Emails Going to Spam?
  • Sign Ups: Sign up not appearing on front-end
  • Troubleshooting: Admin getting “You do not have sufficient permissions” message
  • Understanding Cache – Why Can’t I See My Changes?
  • Report a bug
  • Troubleshooting: How to fix a 404 page error

Fundraisers

12
  • Fundraisers: Review system emails
  • Fundraisers: Exporting Orders
  • Fundraisers: How to reconcile orders with Stripe
  • Fundraisers: Make a Test Payment
  • Fundraisers: Order Status
  • Fundraisers: Create your first fundraiser
  • Fundraisers: Customize the display scheme
  • Fundraisers: Create system pages with a shortcode
  • Fundraisers: Display fundraisers on Fundraiser Listing page
  • Fundraisers: Set plugin administrators
  • Fundraisers: Getting Started
  • Fundraisers: Sell Memberships

Stripe

6
  • Stripe: How to set deposit interval
  • Stripe: How to process a refund
  • Stripe: Find my Client ID
  • Stripe: How to enable Connect on your account
  • Stripe: How to connect your fundraiser to Stripe
  • Stripe: Find my API Keys
  • Home
  • Knowledge Base
  • Messenger - Requires Shared plan or higher
  • Messenger: Importing Subscribers
View Categories

Messenger: Importing Subscribers

PTOffice allows you to import subscribers in a variety of ways. Here’s how:

  1. Login to your PTOffice website.
  2. Under Applications > Email & Newsletters, choose the Subscribers menu item.
  3. Click the Import button located along the top menu.

Import subscribers #

This screen enables you to import users from different sources.
PTOffice keeps track of your users’ subscription and unsubscription! This way, even if you try to import twice the same users, PTOffice will take care of the duplicate entries and won’t subscribe an unsubscribed user again.

Source #

You can import users from different sources according to your needs.
  • Import from file : Import your users from a CSV or a text file.
  • Import from text : Instead of uploading a file, you can directly copy/paste your contacts in an input box and let PTOffice import them.
  • Users : Synchronize / Import the users that have an account on your website
  • Database : If you have a table in your database with a list of users you would like to use, you can import them using this option
​

Import from file #

CSV file #

The first line of your CSV file can tell PTOffice the name of the fields to import (column names of the #_acym_user table from the database if you want PTOffice to assign them automatically).
For example, if your file contains a list of users with the format “email,name,active”, this first line of your file should be “email,name,active” (always in English).
If your file only contains a list of e-mail addresses, simply add them one per line, PTOffice will know what to do 😉
If you are not sure about your column names, simply try to upload your file and PTOffice will allow you to assign the columns to the right fields.
For the field confirmed, the values should be 0 (for not confirmed) or 1 (for confirmed). If you don’t specify this column in your file, the default value is 0 (not confirmed).
name,email
john,[email protected]
adrien,[email protected]
mike,[email protected]

Excel file #

If you have an excel file with all your contacts, simply add a new line at the top to indicate the column name (email, name…) and then save your file in a CSV format (Save as -> CSV). You can then import your CSV file in PTOffice. You can open your file with a text editor (notepad for example) to check if your file has the right format.
In some cases you want to import users and individually subscribe them to some lists. In that case you can add a column called listids in your import file. If you do so, you can then specify the ids of the PTOffice lists you want the user to be subscribed to during the import.
name,email,listids
Adrien,[email protected],3
John,[email protected],8-4
So Adrien will be subscribed to the list with the ID 3 and John will be subscribed to the lists with the IDs 8 and 4. If you want to subscribe them all to the same list, please remember you don’t have to use this extra parameter!
You can also add a column called “listname” in your import file. If you do so, you can then specify the name of the AcyMailing lists you want the user to be subscribed to during the import. If the list doesn’t exist yet, it will be automatically created.
name,email,listname
Adrien,[email protected],My list A
John,[email protected],My list B – My new list C
So Adrien will be subscribed to list A and John will be subscribed to lists B and C. As the list C doesn’t exist yet, AcyMailing will create it.
When importing data for a custom field of “Date” type, such as a birthday field, the data must follow this format to work in AcyMailing: YYYY-MM-DD. For example, 1993-03-20
name,email,birthday
Adrien,[email protected],1986-01-03
John,[email protected],2009-09-11
Once you selected your file, click on the “Import” button, you will get to the next import page where you will find all the import options.
Second import step
PTOffice will automatically suggest which columns to assign to the data you want to import. But you can modify and complete it if needed. You can assign a column to an PTOffice default field or a custom field or ignore some columns. You can ignore all the unassigned columns using the upper option.
  • File Charset: We recommend you to import an utf-8 file but if you import another format, you can let PTOffice handle the conversion in which case you should specify the encoding format of your imported file/text area data.
  • Import the user as confirmed: you can decide if you want your users to be imported as confirmed users (so you will be able to send them an e-mail) or if you want the users to be imported as unconfirmed, in which case you could then send a confirmation e-mail to your unconfirmed users.
  • Auto-generate User’s name: if you only import emails, you can ask PTOffice to create a name from the email ([email protected] will set adrien as name).
  • Overwrite existing user’s information: if the user already exists in PTOffice, doyou want to replace his information by the one imported?
Once you selected the options and assigned the columns as you want, click on the “Import users” button to import your users.
Lists
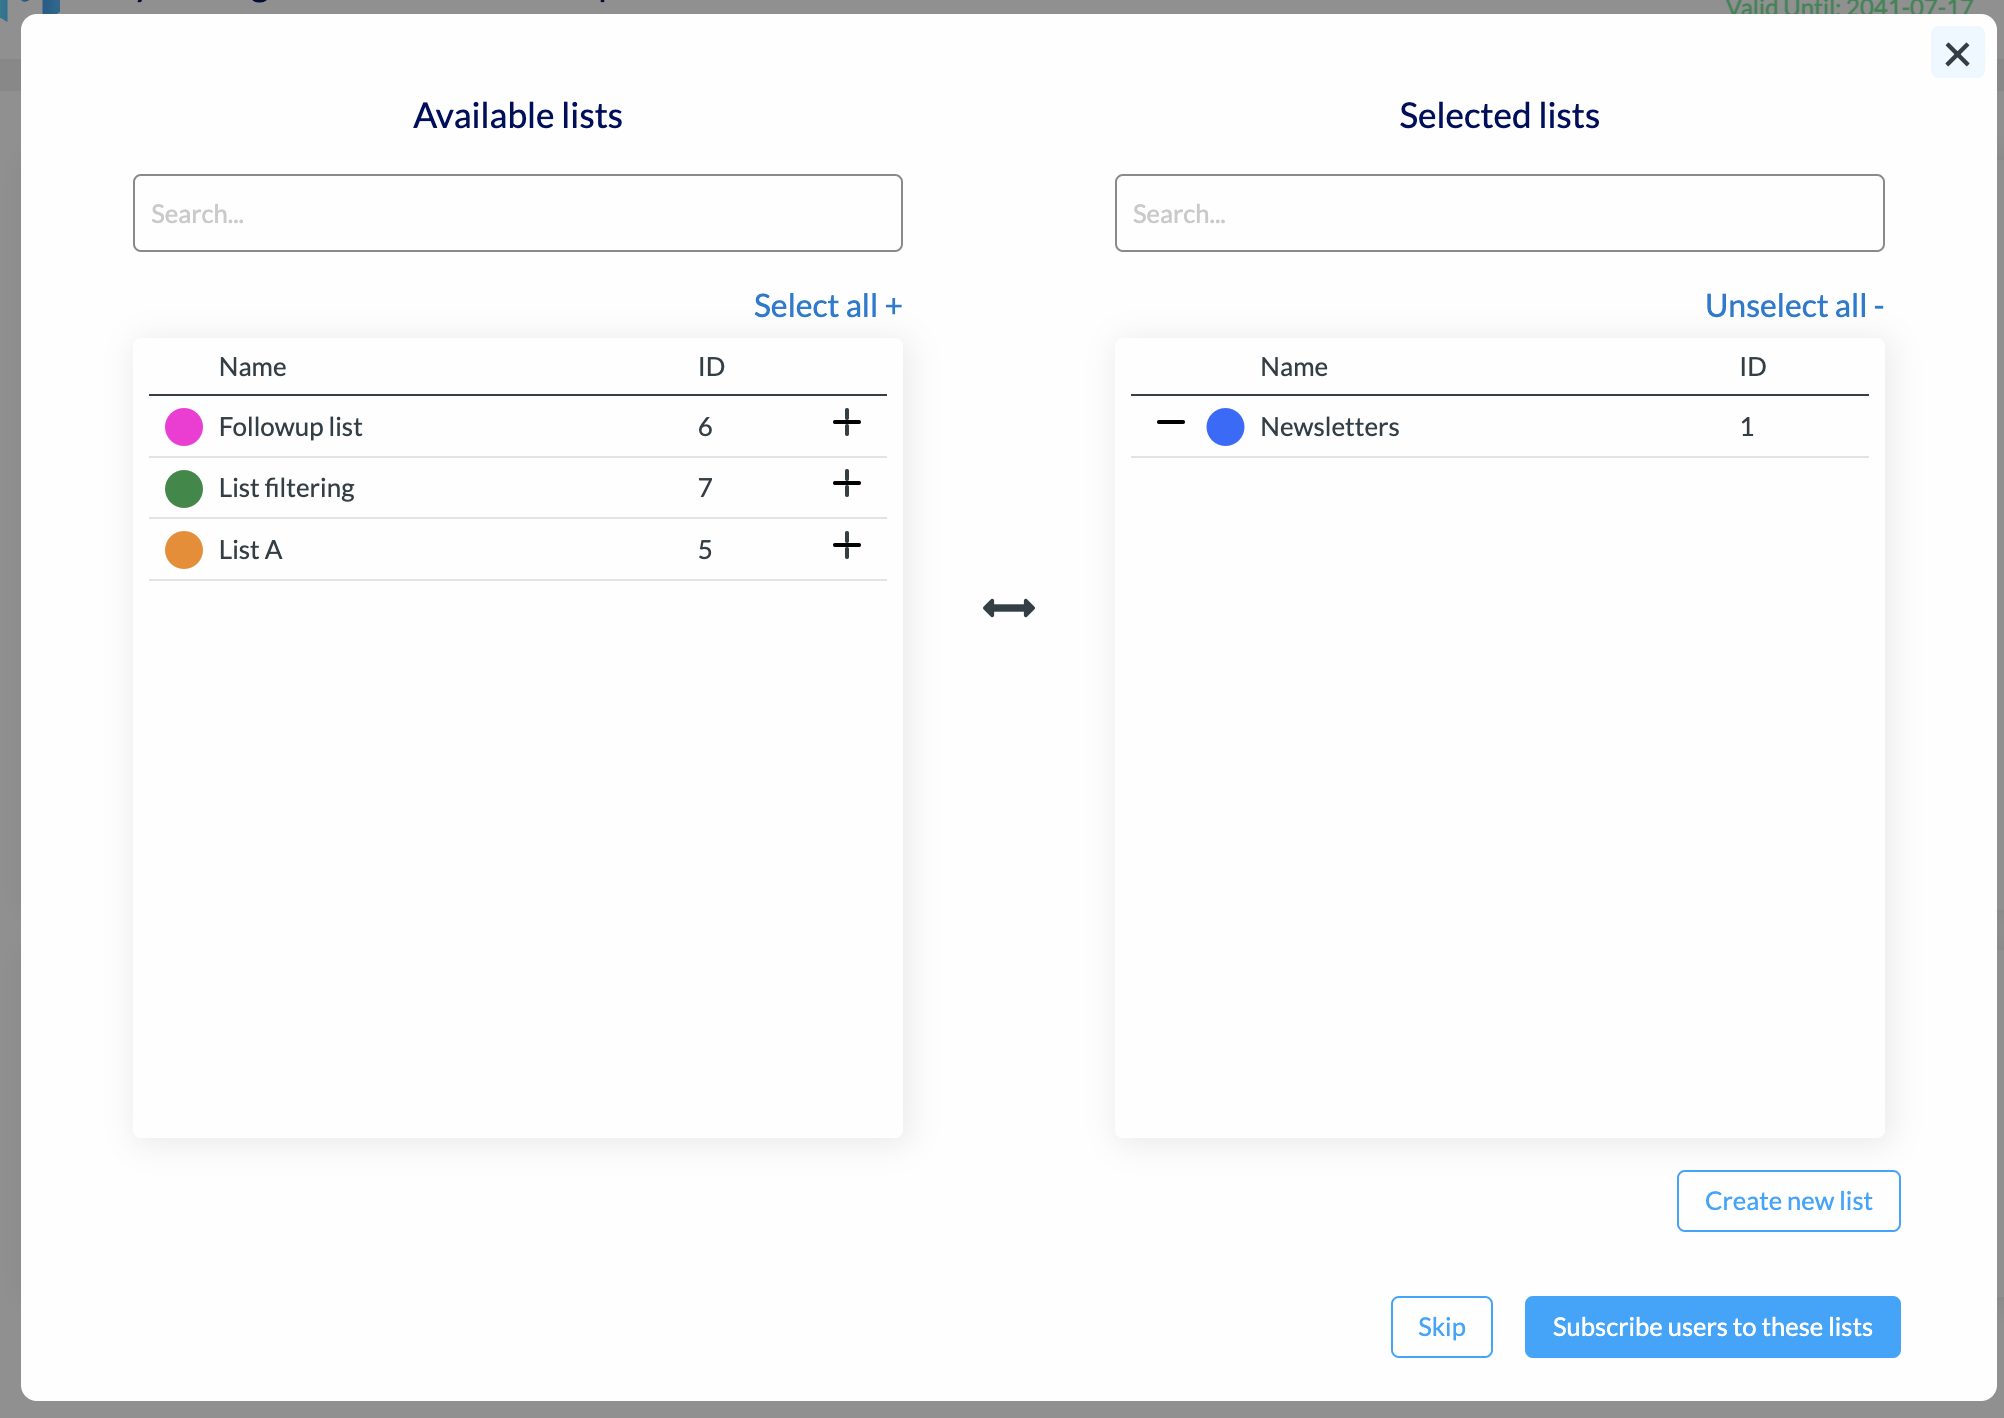
When importing users in PTOffice, you can directly subscribe them to lists or you can directly create new list via the button Create new list.
PTOffice keeps track of the unsubscribe status of the user so that even if you import twice the same users on your lists, PTOffice won’t subscribe users who already unsubscribed.
What are your Feelings
Share This Article :
  • Facebook
  • X
  • LinkedIn
  • Pinterest
Still stuck? How can we help?

How can we help?

Updated on January 9, 2024
Messenger: Understanding MessengerMessenger: Personalize your emails

Powered by BetterDocs

Leave a Comment Cancel Reply

You must be logged in to post a comment.

Table of Contents
  • Import subscribers
    • Source
  • Import from file
    • CSV file
    • Excel file